Happy New Year to All!
It is finally 2010 and I am still working on various projects. I have a new crochet pattern for a hat with ear flaps that I need to finish and will put on the site soon. And other crochet projects with the help of ravelry.com. Please check back later with updates.
May all your dreams and wishes come true this 2010 year. God bless.
Saturday, January 2, 2010
Tuesday, December 29, 2009
My Very First Projects
A Hat that wished to be something else .....
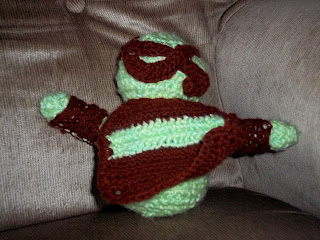
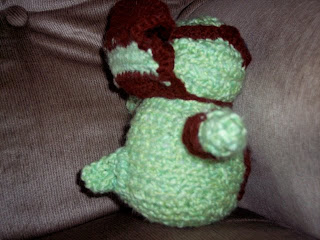
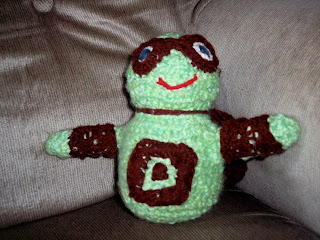 This was to be a hat. It was my first project after teaching myself to crochet. It took me awhile and then I realized I was making the hat too small. This was because my stitches run too tight. Instead of unraveling it, I thought I would turn it into a stuffed doll. And this was the result. I improvised on the arms, tail, cape, mask, and wrist bands. Not too bad for a beginner.
First hat and scarf ....
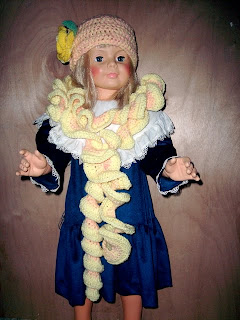 This "set" taught me that I should always have the right amount yarn on hand for the projects when planning to make a set. I think the rose is too big. I was going to give them to a girl I know, but I am not sure. The scarf is way long as you can see on my "three year old" doll (who I have had since I was 5 years old).
I used two shades of yellow to add depth on the rose. The Pattern you can find on Crochet Spot by Rachel Choi.
The hat pattern can be found on Head Huggers website. It is called Double Crochet Hat Pattern by Sharen Stennet.
The scarf is a pattern I got from the book kit I taught myself Crochet (Boye #6397) on page 25. It is called Ruffled Skinny Scarf by Kim Biddix. I got my book kit from Walmart.
 This was to be a hat. It was my first project after teaching myself to crochet. It took me awhile and then I realized I was making the hat too small. This was because my stitches run too tight. Instead of unraveling it, I thought I would turn it into a stuffed doll. And this was the result. I improvised on the arms, tail, cape, mask, and wrist bands. Not too bad for a beginner.

First hat and scarf ....
 This "set" taught me that I should always have the right amount yarn on hand for the projects when planning to make a set. I think the rose is too big. I was going to give them to a girl I know, but I am not sure. The scarf is way long as you can see on my "three year old" doll (who I have had since I was 5 years old).
I used two shades of yellow to add depth on the rose. The Pattern you can find on Crochet Spot by Rachel Choi.
The hat pattern can be found on Head Huggers website. It is called Double Crochet Hat Pattern by Sharen Stennet.
The scarf is a pattern I got from the book kit I taught myself Crochet (Boye #6397) on page 25. It is called Ruffled Skinny Scarf by Kim Biddix. I got my book kit from Walmart.
Saturday, December 26, 2009
Christmas with Raverly.com Help.
I made these projects for Christmas Presents. The patterns I got from various designers on Ravelry.com. I am posting them in order of completion.
Pattern by April Draven
Bella's Hat *Twilight*
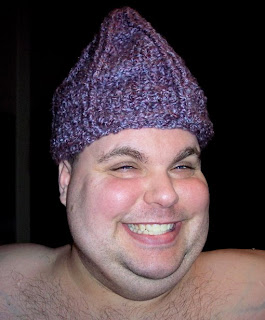
Thanks to my husband for modeling it. I used Homespun Baroque (purple) because it was for my niece who likes purple. The pattern I wrote for the New Moon Gloves were made to go with this hat.

Pattern by Suzanne Steiger Homespun
Visor Beanie Crochet Pattern
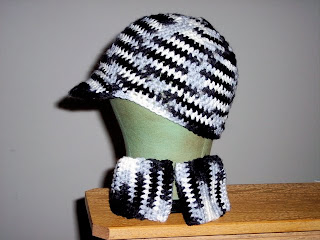 This one was made for my nephew with wrist cuffs that I free styled.
 The black and red/orange hat was made for my niece with the visor made a little longer.
Pattern by Fiber'clectica
Rebelious Wrist Warmers
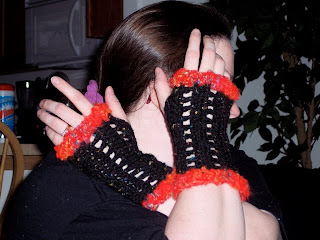 I made these to go with hat for my niece
Pattern by Bren at Woodhill Design Pattern
Luxury Hat
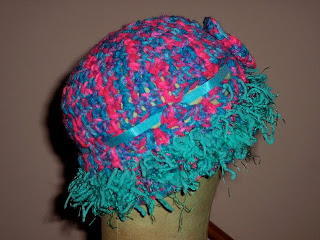 I added a ribbon and a flower with beads. I also used Crystal Palace Squiggle Neptune Teal instead of fur.
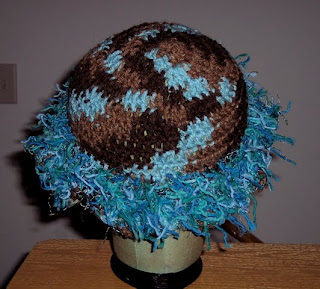 Again I used Squiggles yarn, but color Blue Grotto. I also used a scalloped edge that made a small brim.
Pattern by Creativeyarn
Mohair Handwarmers
 This I made to go with the hat shown above. Again, adding beads to the flower and squiggles yarn. I also made this longer than the pattern required.
 I added a scalloped edge using a different yarn as well as the squiggles yarn to match the above hat. This is only 2 stitches longer than the pattern.
I have more to post from Christmas projects. I will have to get them in a different post. I have to go right now. My husband is taking me to see Sherlock Holmes tonight. I am so excited.
Peace On Earth
Free Style Beanies
Just a little imagination goes a long way
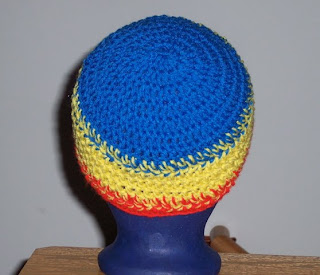
Here are a few of beanies that I made for boys in my family. I have not written a pattern for these, but if you would like one, please let me know and I will try to create one for you.
The first one I call Primary Color Beanie. It is very basic and done in double crochet and has thirteen rows. Between each row of color I used each color together and crochet both at same time then changed to the next color.
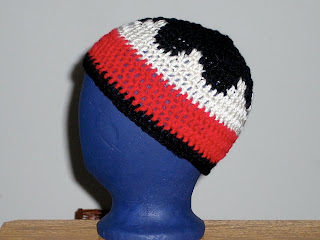
The second one I call Spike of Color Beanie. I just tried to break up the black after creating the crown potion of the beanie and this was the result. I then wanted a little color by adding the red and finishing it off with black again. Total of 13 rows in double crochet.
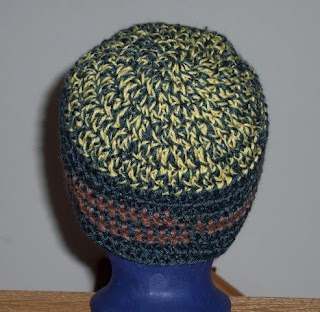
This third one was improvised as well. I used double strand method and a rectangle type pattern.
Total of thirteen rows.

Formula for Hats/Beanies Chart
Formula: Subract at least 1” from Circumference and divide by 3.142 (π [Pi]) to get Diameter (Cir./Pi=Dia.)
Measure across the center of the hat round (circle) to get your size in diameter when you are crocheting or knitting.

Measure across the center of the hat round (circle) to get your size in diameter when you are crocheting or knitting.
Note: The chart is an estimate. I rounded up/down to nearest inch.
Age
|
Head Circumference
|
Diameter
|
0 - 3 months
|
14”
|
4.25”
|
3 - 6 months
|
15”/16”
|
4.5”/4.75”
|
6 - 12 months
|
16”/17”
|
4.75”/5.0”
|
12 - 24 months
|
17”/18”
|
5.0”/5.5”
|
2T - 4T
|
17”/19”
|
5.5”/5.75”
|
5T - Preteens
|
19”/20”
|
5.75”/6.0”
|
Teens
|
20”/21”/22”
|
6.0”/6.5”/6.75”
|
Adults
|
22”/23”/24”
|
6.75”/7.0”/7.25”
|
© 2009

Puzzle Block Beanie

Puzzle Block Beanie
by Maria Graef
This is a free pattern for you to use only for personal use.
I created this pattern by free-styling crochet. I did not have a pattern to look at or a photo. I will try to create the pattern as best as I can. My stitches tend to be tight, so my gauge would not work for you.
I have a formula that I created with help for Azzy's Skater hat on Raverly. Please check my other posts for the whole formula chart. It is a basic geometry formula.
This hat patten is based on a size 17" in circumference head size.

Stitches Used: chain (ch), Double Crochet (dc), Slip Stitch (sl st)
Other Abbreviations Used: beg = beginning, st = stitch, sts = stitches, * = repeat
Finish Size: 17" cir. with 13 rows
Gauge: based on hook size and head size
Stuff You'll Need: I used hook size K (6.5 mm), Tapestry Needle, Scrap Yarn (worsted Acrylic)
Note: chain 2 does not count as 1st dc in rounds.
Rnd 1: Make a magic ring (MC) and ch 3 in ring (counts as first dc) then make 11 dc more in ring over the tail of the ring. Then pull tail tight and join with sl st in top beg ch 3. (12)
Rnd 2: ch 2 (does not count as 1st dc) 2 dc in same st, 2 dc in each st round, join with sl st in ch 2. (24)
Rnd 3: ch 2, 2 dc in same st, *1 dc in next st, 2 dc in next st, repeat from *, join with sl st in ch 2. (36)
Rnd 4: ch 2, 2 dc in same st, *1 dc in next two sts, 2 dc in next st, repeat from *, join with sl st in ch 2. (48)
Rnd 5: ch 2, 2 dc in same st, * 1 dc in next three sts, 2 dc in next st, repeat from *, join with sl st in ch 2. (60)
Note: If you stop at rnd 5 then rnd 7 & 8 will be your rnd 6 &7, adjustments to stitches will be in [].
Rnd 6: ch 2, 2 dc in same st, *1 dc in next four sts, 2 dc in next st, repeat from *, join with sl st in ch 2. (72)
Rnds 7-8: (do not finish off starting color yarn when changing colors until starting color is finished. After joining yarn, use the method of holding yarn at top of round and stitching over it to make it easier to change colors) ch 2, dc in same st, *1 dc of first color yarn in next 12 [10] sts, 1 dc of second color yarn in next 12 [10] sts, repeat from *. join with sl st with both color (the pattern should be 3 sections of 1st color and 3 sections of 2nd color, finishing with 2nd color), fasten off first color at end of rnd 8. (72)
Rnds 9-10: ch 2, dc in same st, *1 dc in next st, repeat from *, join with sl st in ch 2. (remember you are on your second color). (72)
Rnds 11-12: (using same method in Rnds 7-8, but using second color and adding third color) 1 dc of second color yarn in next 6 [5] sts, *1 dc of third color yarn in next 12 [10] sts, 1 dc of second color yarn in next 12 [10] sts, repeat from *, 1 dc of second color in last 6 [5] sts, join with sl st with both color (the pattern should be 3 sections of 2nd color and 3 sections of 3rd color, finishing last 6 sts with second color), fasten off 2nd color at end of rnd 12. (72)
Rnd 13: ch2, dc in same st, *1 dc in next st, repeat from *, join with sl st in ch 2. (remember you are on your third color). (72)
Fasten off with third color and weave in ends.
© 2009
Monday, December 21, 2009
Ria's Fingerless Gloves Inspired By New Moon

Ria's fingerless Gloves
By Maria Graef
This is my first pattern. Please let me know if I need to improve it. Also, this is a free pattern for you to use only for personal use.
Stiches Used:
chain (ch),
slip stitch (sl st),
double crochet (dc),
front post double crochet (fpdc),
back post double crochet (bpdc),
half double crochet (hdc),
decrease half double crochet (dec hdc)
Finished Size:
Adult woman size
Stuff you'll need:
1 skein Homespun by Lion Brand, Hook size: J/10 – 6.00mm, Tapestry needle
Gauge:
4 stiches and 3 rows = 1” in hdc with size J/10
Instructions:
Note: ch 2 does not count as first dc and ch. 1 does no count as first hdc.
ch 25, join with sl st in first chain (make sure chain does not twist)
rnd 1: ch 2; dc in each ch around; join with sl st. (26)
rnds 2 – 5: ch 2; *fpdc around next dc, bpdc around next dc; repeat from *; join with sl st. (26)
rnd 6: ch 1; hdc in same stitch; * hdc in next dc; repeat from *; join with sl st. (26)
rnd 7: ch 1; dec hdc in next 2 hdc; * hdc in next hdc; repeat from *; join with sl st (25)
rnd 8: ch 1; dec hdc in next 2 hdc; * hdc in next hdc; repeat from *; join with sl st (24)
rnds 9 – 15: ch 1; hdc in same sticth; * hdc in next hdc; repeat from *; join with sl st (24)
rnd 16: ch 2; * hdc in next hdc; repeat from * stop at stitch 22 (22)
rnd 17: ch 2; turn; * hdc in next hdc; repeat from * (22)
rnd 18: ch 2; turn; * hdc in next hdc; repeat from * ch 2; join with sl st (24) (make sure chain does not twist)
rnd 19: ch 2; dc in each ch; * dc in next hdc, repeat from *; join with sl st (24)
rnds 20 – 21: ch 2; *fpdc round next dc, bpdc around next dc; repeat from * join with sl st (24)
rnd 22: ch 2; * fpdc around next dc, bpdc around next dc; repeat from *; join with sl st (24)
Fasten off and weave in ends.
© 2009
Subscribe to:
Posts (Atom)